A Step by Step Guide on How to Adjust the Dixon ZTR Cone Drive
The Dixon ZTR tractor was a zero-turn and compact mower with a 30-inch stamped deck and a powerful 16.5 Briggs and Stratton engine. While it is no longer manufactured, there are some models left throughout the market, and many are still used regularly. As a result, it is important for owners to understand how to fix and adjust this mower if they run into problems.
For example, you need to know how to adjust Dixon ZTR cone drive models because these units help keep the tractor running smoothly and efficiently. Below, we’ll provide you with the information that you need to handle this step yourself. These include which tools are required and the step-by-step process necessary to adjust your cone drive properly and effectively on your mower.
Tools You’ll Need
There are a few special tools that you’ll need to adjust the Dixon ZTR cone drive properly. Each of these tools should be available in most kits, though there is at least one that should either come with your tractor or be available from Dixon or other mechanic shops. These tools include:
- An eleven-sixteenth open-end wrench that you can adjust if necessary
- A one-half inch open- or box-end wrench with easy adjusting
- The special Dixon tool that comes with your tractor or a pocket square
If you cannot find the special Dixon tool or lost it after buying the ZTR, you can typically use a pocket square to get the same results. The Dixon tool will ultimately give you easier control over the adjustment, so use it whenever possible. But if you can’t find one online or can only find one for very high prices (it is possible because the ZTR is discontinued), just use a pocket square instead.
How to Adjust Dixon ZTR Cone Drive on Your Tractor
Adjusting the Dixon ZTR cone drive requires carefully loosening several nuts, adjusting torque rods, and making other careful changes to the unit to ensure that it is operating smoothly. Thankfully, this process is something that even inexperienced tractor owners can handle. Just make sure to work slowly and only adjust the drive slowly as you work to ensure that you don’t damage it in the process.
Step One: Loosening Locking Nuts
Start by identifying the locking nuts on the Allen head pivot by the rear of the transmission. These nuts should lock tightly to the unit and require the eleven-sixteenth wrench to open. Place the wrench over the end of each nut and carefully loosen them, in order evenly, to make it easier to remove this part.
After you have carefully loosened these nuts, you can place your wrench down for now. You’ll then need to find the one-half-inch wrench and identify the outside locking nuts on the torque rod. We’ll discuss how to do that in the next step to make this process easier to handle.
Step Two: Slightly Loosening the Torque Rod Nuts
Identify the nuts on your torque rod by finding the rod that runs from your engine toward the back of the tractor. These nuts require the half-inch wrench and should either be open- or box-ended. Typically, both will work on these nuts but the box-end give you a bit more control.
You aren’t going to remove these nuts entirely but simply loosen them up a little. They should be fairly tight on the part, so use a little even pressure to loosen them. Turn the wrench no more than once or twice around to loosen them properly. They should still be on the torque rod when you’re done.
Step Three: Adjusting the Pivot Bolt on the Allen Head
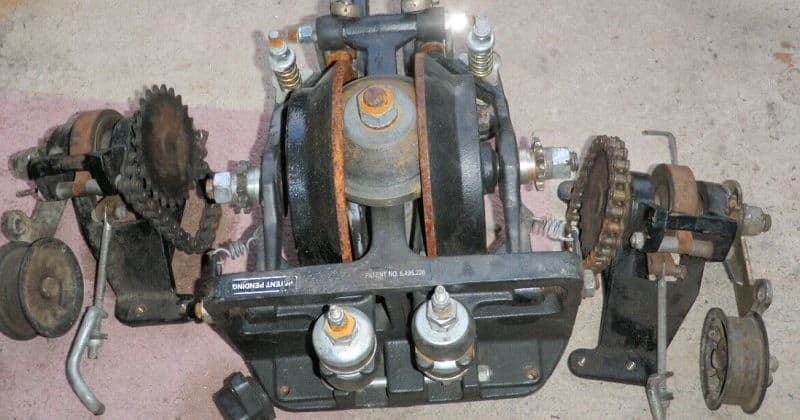
This step might seem a little complex at first but isn’t too bad if you’re careful. Taking this step properly will eliminate the gap between the discup and cones, which is vital while adjusting. Start by finding the Allen head pivot bolt and turning the nut found on the inside of the torque rod.
As you turn these nuts, you should notice the discup moving toward the cone. Use this ratio when adjusting the bolts: turn the torque rod nut twice after turning the pivot bolt once. Carefully continue loosening them until the cones and discup connect.
Step Four: Square the Discup
Here’s the point where you’ll need that Dixon special tool. Connect it to the front of the back of the discup and carefully adjust the discup to square it up with the back of the frame. You can also use the pocket square if necessary, though the special tool gives more accurate readings.
Once you’ve squared it up, measure the angle with the tool and keep it in mind as you adjust the unit. Later on, you can use this measurement, if needed, to further tweak your discup or to reset it back to the position you got it to earlier before adjusting further.
Step Five: Loosening the Adjustment Bolts
Use the proper wrench to carefully loosen the adjustment bolts. Go slowly when you adjust these bolts and always loosen them at the same amount. A quarter-turn per adjustment is a good idea for most adjustment processes. Keep on adjusting it until you get the gap between the cups and cones to 0.20 to 0.25 from both sides.
This measurement is found by tracking the angle with the special tool or pocket square. Once you’ve reached that level, you have set the new neutral gap position for your cone drive. From here, you’ll do a little more adjustment to ensure that your cone drive is operating properly.
Step Six: Making a Few More Adjustments
Rotate the upper spring nut to help to even the distance between the upper and lower cones. This distance should be congruent with the rest of the part and will vary depending on your unit. Slowly adjust the distance as you did with the adjustment bolts to avoid going too far.
You can now create a similar gap size between the bottom rod lock and the lower spring nut by adjusting the nuts. As always, adjust slowly and with minute turns. Once you’ve reached that special spot, you’re just about done, but have a few steps to take to ensure that you’ve done it right.
Step Seven: Adjusting the Steering System
Now that you’ve adjusted your cone drive, you need to carefully tweak the steering levers to make them even. This requires identifying their adjustment rods and turning the screws carefully. Tighten one side slightly, move to the next level, and continue until you’ve got them level.
This step is critical because it not only helps properly adjust your cone drive but ensures that your steering system runs smoothly and straight. Otherwise, your adjustment isn’t going to be effective and may result in your mower roaming around awkwardly as you drive.
Step Eight: Checking for Any Problems
At this point, you’ve done just about all the hard steps and are nearly finished. However, that doesn’t mean you’re finished! Instead, you need to check the mower to make sure it is safe. Move the mower slightly, with the engine off, and listen to the inside of the unit as you move it.
If you notice a scraping sound, the cups may be bumping up against the cones. This problem requires adjusting the neutral spring nuts in whatever direction decreases this problem. At this point, you can tighten all the rest of the screws to hold your adjustments in place. Only one more step to go!
Step Nine: Testing Out Your Adjustment
After you feel comfortable with your adjustments and have tightened the bolts properly, you need to take it for a quick test drive. Turn on the engine and sit down. Does it run smoothly while you sit or is there an awkward lurch that wasn’t there before? If so, turn it off and go to step 10.
When you don’t notice a weird noise or awkward lurch, drive the machine forward on a flat area. Let go of the steering wheel as you drive slowly. Does it hold a straight line or does it want to turn to the left or right? If it drives straight, you’re finished! When it tries to change position, go to step 10.
Step Ten: Optional Adjustments
Only take this step if you were told to do so in step nine. When you notice any problems with your mower’s operation after adjustment, turn it off, put the key somewhere safe, and perform the adjustment process again. Look at where you might have gone wrong and try to troubleshoot the issue.
For instance, check your nuts to make sure that they’re truly tight after finishing with adjustment. There is a small chance that one or more might be loose, so make sure to tighten them as needed. Doing so will ensure that your mower runs effectively and with minimal issues.
If tightening up the bolts doesn’t help, you may need to do further adjustments, such as widening the gap slightly or carefully tweaking the discup position. When all else fails, take your mower to a mechanic, tell them what happened, and they should be able to fix it easily enough for you.
You can also read:

