How to Change The PTO Belt on Grasshopper Mowers
You must be immediately impressed by a beautiful green lawn or pleasant attractions. A mower, which trims grass to a consistent level, is the unsung hero that makes it seem professionally manicured.
It may be a pain if you don’t know how to remove the PTO belt on a grasshopper tractor, substitute it, and afterward put it back together.
Blades and motors on lawnmowers are driven by a power take-off (PTO) belt. If you don’t know what you’re doing, you might damage the brand-new belt you bought by putting it too close to the blade when you try to change the PTO belt.
So, read on to find out more information.
What Time Should You Replace Your Grasshopper PTO Belt?
Immediately update the belt if any of the following descriptions fit your machine.
- Worn out PTO belt due to widespread fungal decay
- The irritating machine squeak when in use
- Turning off and on repeatedly
- Heat is no match for the engine, which continues to spin.
A Checklist for Preparing for Change
To make the tasks at hand more manageable and efficient, you should set up the equipment and yourself properly beforehand.
Equipment
To be fully prepared for any changes that may come your way, it is crucial to have the right tools and equipment on hand, as well as a clear plan of action. As long as you follow the steps in this guide, you won’t need help from a professional to repair or replace the PTO belt.
Instead, read the instructions with the device and, if feasible, talk to somebody who has used it previously and had luck.
Hold the Mower Upright and Turn It On
If you need to access the underside of a mower, it should be placed vertically to reach it from where you’re positioned.
Lay Flat the Mower Deck
Throw open the mowing deck doors. In fact, that’s where everything goes down on the inside. As a result, the mower blades will be exposed. This will automatize the separation of the blade from the PTO belt. For example, it is a good time to change blades that have grown dull.
Take Off The Old, Damaged PTO Belt
Changing the belt on your Grasshopper tractor is a must if the belt’s health is anything like what was described.
How to Change The PTO Belt on Grasshopper Mowers
In order to change the PTO belt, you may do one of two methods. Just pick the more straightforward option and go with that.
Method 1: Put A New Belt On The Pto That Goes Around The Clutch
1. Connect The Belt With Spindle Nut
The central spindle is where you should begin installing the belt. Insert the belt with the help of a torque wrench. Using just your bare hands throughout the process is entirely safe. It’s obvious that the belt needs to be engaged around the spinning clutch since it’s what turns the mower blades. Although it may take a lot of strength, you should be able to rotate the clutch by hand.
2. Wrap the Belt Snugly
If you rotate the wrench when holding the belt in place on the PTO sprocket, you’ll be able to get it to fit correctly.
A helpful hint is to maintain the belt moving with your right hand while holding the pulley with your left. It’s more difficult for the belt to slip out of place in this configuration.
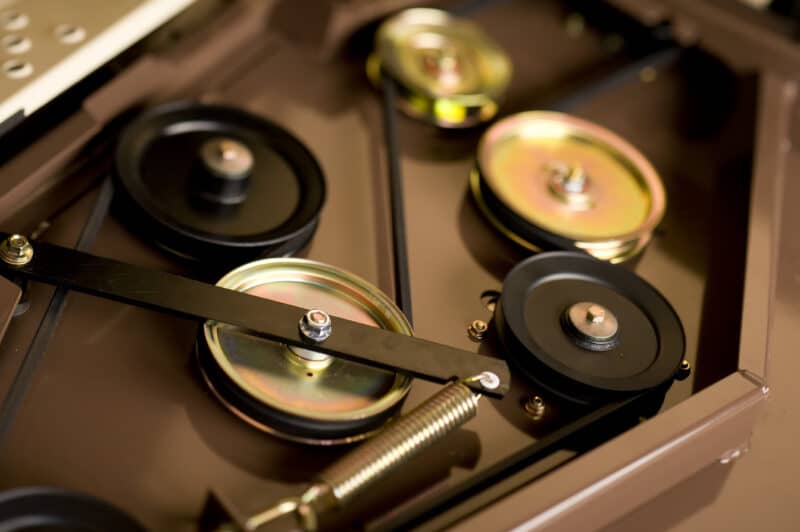
Method 2: Swap Out the Belt That Drives the PTO Under the Freeloaders
1. Don’t Forget to Remove the Unused Halts
Start by releasing the layabouts on your left. That idler is visible from where the tractor is positioned. Keep that idler attached to the top level with a hammer. As soon as the spring is removed, the idler may be released.
2. Fix the Belt
Step two begins with no idlers in motion. As a result, the belt may be cinched around it. Since the layabouts are not active, you may spend some time adjusting the strap. Again, the belt’s path needs to be as direct as possible.
You can connect a pair of pliers to the PTO clutch cinched end of the belt in order to prevent it from unraveling while you’re working with it. The job is not complete until the belt is wrapped tightly around the spindle.
3. Put Covers Again
Put the cover securely on the belt and sprocket when you’re done. This will help to keep the belt in place while you continue working on the mower. Moreover, it will prevent dirt and debris from entering the PTO system, which can cause further damage to the belt.
Once everything is in place, turn on the mower and check if it’s working correctly. If everything is working as expected, then congratulations! You have successfully replaced the PTO belt on your Grasshopper mower. If any problems persist, consult a professional for further assistance.
4. Insert Nut Into Bracket
After you have finished using the repairing belt, you may reinstall the bracket supporting the bolt. Then, the Grasshopper mowing is ready to be used after you have completed any of the steps mentioned earlier.
You can contact the manufacturer of Grasshopper mowers to provide you with more information about how to repair or change the PTO belt. However, this is not a complicated process if you have the right tools and are ready to begin.
Alarming Signs
- All power sources and motors must be shut off before ignition.
- Make sure to let the mower completely cool off.
- When dealing with cables, take your time.
- Avoid damaging or touching neighboring premises.
- It’s imperative that you maintain a safe distance from the cutting edges.
Conclusion
Instructions may change somewhat across Grasshopper versions. There has been no significant development in the method of Changing the Belt. Always refer to the handbook as a starting point before attempting a repair or making an inquiry.
The procedure is complete; reconnect the power and give it a spin. After a day of trouble-free cutting and riding, the PTO belt change was successful.
You may use a lawnmower to transform your unkempt lawn into a stylish one. Unfortunately, the days of feeling revitalized after reading the handbook and fixing the belt yourself are pretty much gone.
You can also read: